
|
Foire aux
Questions (Frequently Asked Questions): |
All the FAQs are
designed only for
current and previous versions of Omni-Series
products.
If you did not
find the information needed from the FAQ sections, please contact
us
XLink Technology,
Inc. Copyright ©
1994-1998
 Installing the software
How do I check whether the installation is complete or
not?
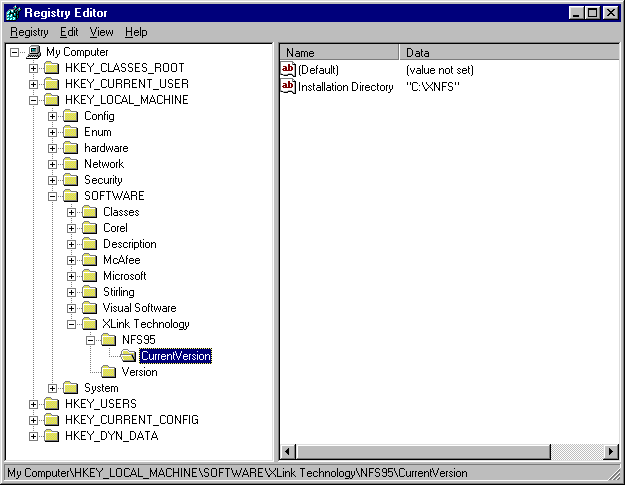
Go to the DOS prompt, type regedit, you should see the
following picture.
Windows 95 ........
Windows NT ........
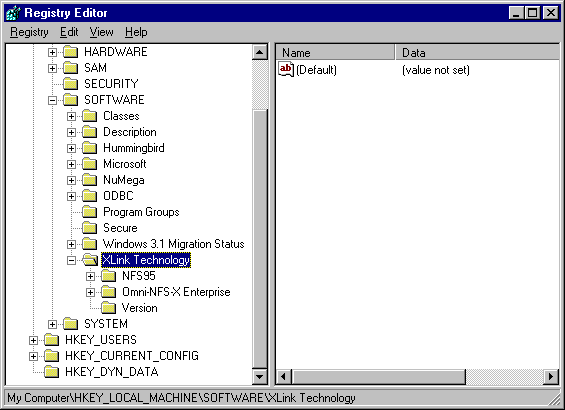
Only when you can see all the folders listed in this picture, is
your
installation complete. Also, if you can see some *.tmp files under
c:\xnfs , it means the
installation is not complete. A complete installation should have
the "host list
" pop out at the end of installation, after adding a new host
to the list , you must
exit it.
Install |
Uninstall |
NFS Server |
NFS Client |
LPR |
LPD |
X-Server |
VT420 |
Miscellaneous
How to uninstall the product manually
If you can't uninstall the software completely using the Uninstall
program, you may need to do the uninstallation manually by doing the
following...
Go to the Registry Editor by typing regedit in DOS and
follow the steps below:
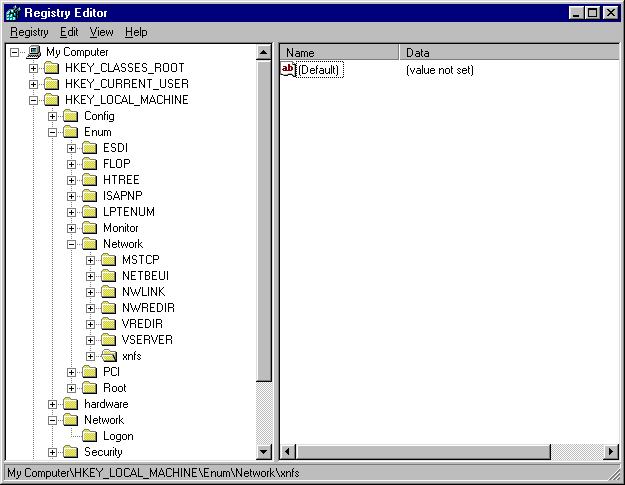
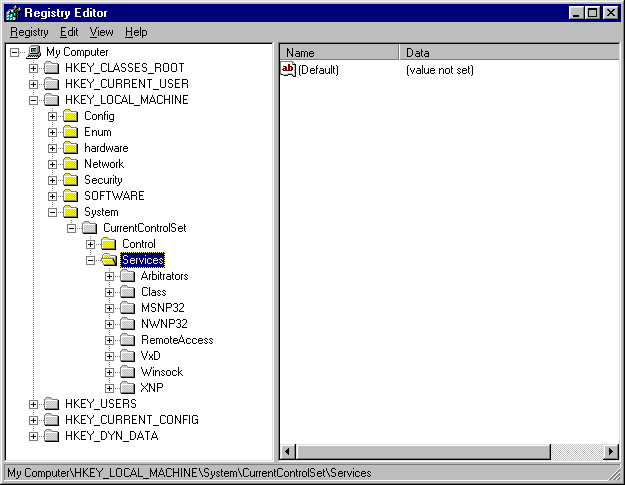
Windows 95 ........
1. Delete xnfs
2. Delete XNP under Services
3. Delete XNP in Order
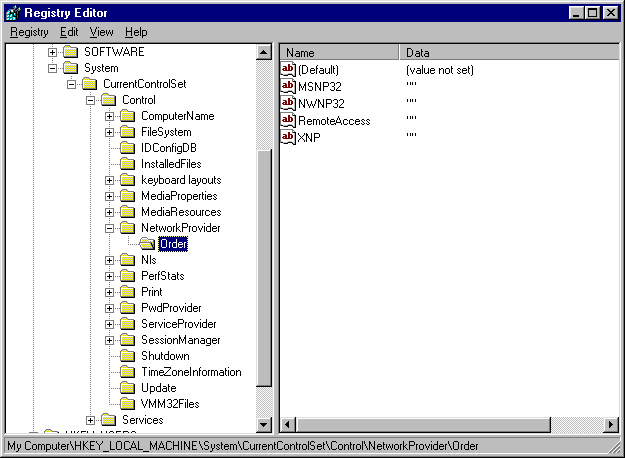
4. Delete XPP under Providers
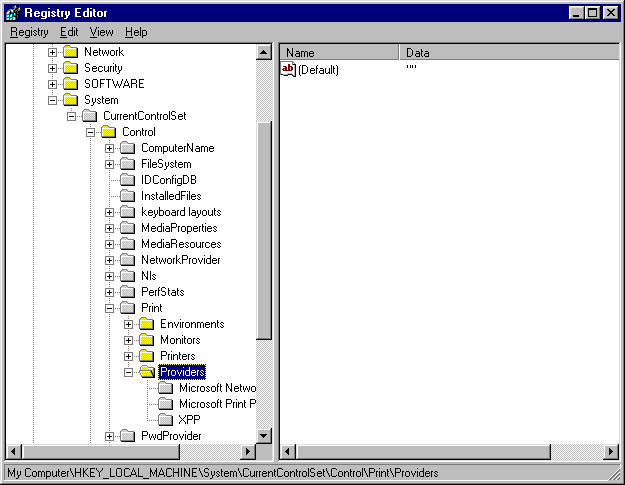
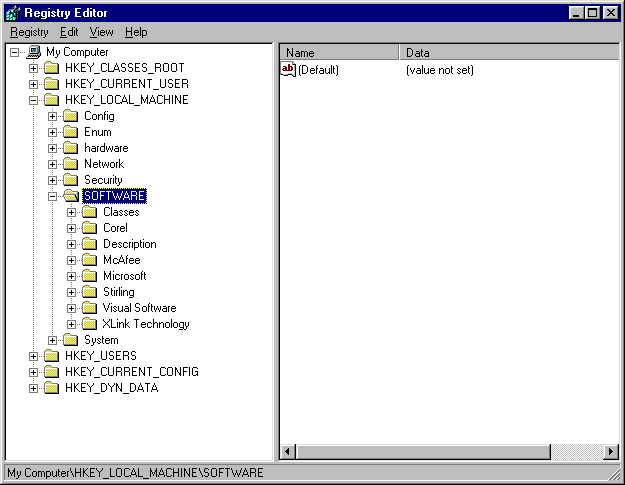
5. Delete XLink Technology under
SOFTWARE
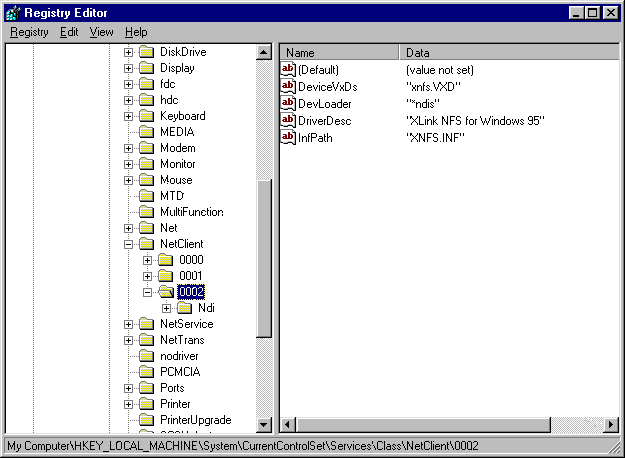
6. Delete 0002 in this figure
Windows NT ........
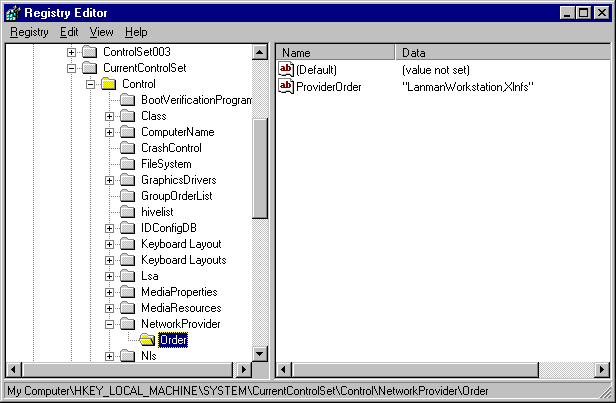
1. Delete Xlnfs in Order under ProviderOrder.
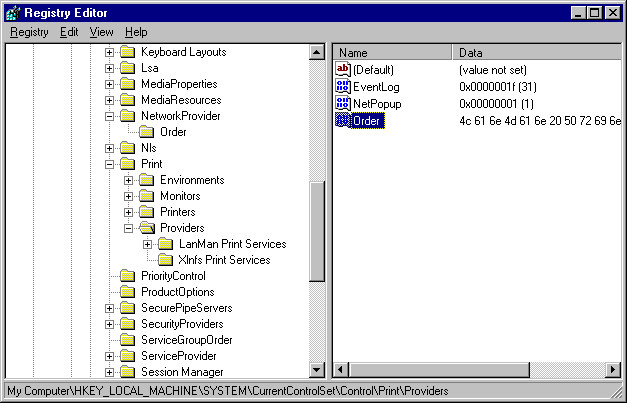
2. Delete Xlnfs Print Services in
Providers.
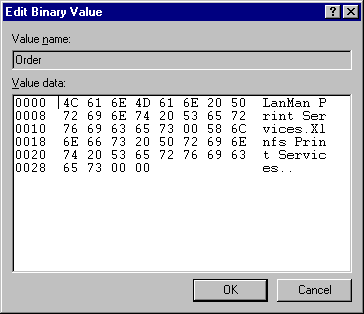
3. Delete binary of Xlnfs Print Servicesin Providers
under Order value.
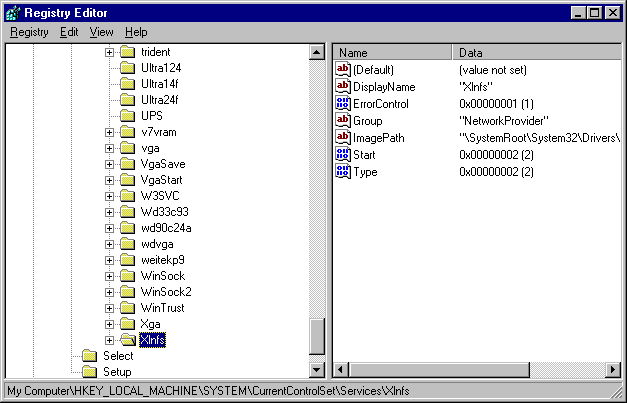
4. Delete Xlnfs in
CurrentControlSet\Services.
5. Delete XLink Technology in SOFTWARE.

Install |
Uninstall |
NFS Server |
NFS Client |
LPR |
LPD |
X-Server |
VT420 |
Miscellaneous
 NFS Server (current and previous versions
only)
How to mount a PC exported
drive/directory on UNIX
- First make sure you have already exported a PC drive/directory
using our Omni- NFS server.
- To ensure that the NFS Server has properly exported the
drive, type the following command to get the exported file system:
Showmount -e <IP address or Host Name of your
                PC>
Example: showmount -e 199.9.9.1
- On the UNIX side, use
mount command following the
example given below:
mount <IP address or Host Name of your PC>:c:/usr
                /mnt
Example: mount -t nfs 199.9.9.1:c:/test /mnt
Here, c:/usr is the PC exported directory.
/mnt is a UNIX directory.
Remember, it is case sensitive.
Error in mounting to the NFS Server
- Incorrect mounting command: refer to How to mount a PC exported
drive/directory on UNIX
- Mount path is not in the right case
- Did not restart services after define an exported drive
Install |
Uninstall |
NFS Server |
NFS Client |
LPR |
LPD |
X-Server |
VT420 |
Miscellaneous
 NFS Client (current and previous versions
only)
How to mount a drive
Follow the steps below to mount a drive in NFS Client:
- Make sure your TCP/IP is installed correctly. So that you can
ping UNIX host from DOS prompt.
- For Windows 95, in
Control Panel/Networks, there 's
an entry for
XLink Omni-NFS. If not, try to reinstall the
software.
- Make sure there is an entry for your PC in your UNIX
hosts file.
- In UNIX 's
exports file, export the directories you
want to mount from PC.
- Make sure UNIX host is defined as NFS server using Omni-NFS
Host Editor.
- If PCNFSD is not running on your UNIX host, use UID and GID
option provided in the Omni-NFS
client program when you define a NFS drive.
- If you fail when you use a root account, use a normal user name
instead.
- Make sure the account you are using has the right to access the
directory
exported in UNIX.
Read or Write error when accessing a file
If you have mounted a drive successfully but have problems reading
or writing files :
- Unmount the drive first
- In Omni-NFS client
Define/Options, turn off the
cache and reduce the
buffer size to 1K. If you are using Explorer to map a NFS drive,
cache and buffer option
can be set in UTILS under NFS client window.
- Remount the drive
Remove the Xlink logon window when
booting Windows 95
If you do not wish to have the XLink
logon window displayed
whenever you start your PC:
- In
Control Panel/Network/Xlink NFS Property, turn
off Network Logon.
- Reboot your PC.
Disable Dial-up Network when initializing NFS Client in Windows
95
If you do not wish to have the Dial-Up Adapter initialized whenever
you open the NFS Client application:
- Unmount all the drives.
- In
Control Panel/Network/TCP/IP->Dial-Up Adapter
                Property
,
unbind the XLink NFS for WindowsX.
- In
Control Panel/Internet/Connection, uncheck the
Connect to the internet as needed.
- Reboot your PC.
Authentication
What is the maximum capacity NFS client can handle
The maximum size of directory that Omni-NFS client can handle is
4GB.
Authentication Error with NFS Client
There are several possibilities that would cause authentication
errors:
- If it is over the evaluation period for EVAL copy
- More than registerd licenses have been installed
- Incomplete installation
- Incorrect mounting path
- Permission not set in the hosts and export files
- Improper TCP/IP setting (use ping to check connection)
- More than one NFS client is installed
- Install with other user name than administrator (applied with
NT)
- Login as root. (or can not see file list after mount)
Install |
Uninstall |
NFS Server |
NFS Client |
LPR |
LPD |
X-Server |
VT420 |
Miscellaneous
 LPR (current and previous versions only)
LPR Driver......
Follow the steps below to mount a NFS printer:
- Make sure you can mount a NFS drive before mounting NFS
printer
- To mount a NFS printer , you MUST use
PCNFSD.
- export
/usr/spool on UNIX system, and mount it from
OMNI-NFS client.
Make sure you have read and write permission to this directory.
- Set the UNIX printer as dump printer if the print result is not
readable.
- Use Windows standard
Add Printer to add a NFS
printer.
- If you can't print to NFS printer from Omni-NFS, try to see if
you can
do it from another UNIX.
How to print with DOS application
- To print data with DOS application, you will need to mount a NFS
printer.
- Follow the steps mentioned in How
to mount a NFS printer.
How to mount a LPR printer
Follow the steps below to mount a LPR printer:
- Start the
LPD application on the UNIX Server
without any
filter option. (dumb printer)
- Make sure the
LPR printer is defined in the
LPR hosts within the Omni-series program group.
- Use Windows standard
Add Printer to add a LPR
printer.
How to disable banner page
The printing of the banner page is defined in the LPD application
on the
UNIX Server. You will need to change the setting of your LPD
application on the UNIX to
disable this option.
How to set -l option if -o can not be
accepted
Add the following section in your xlink.ini file under
windows (95)
or winnt directory:
[xpp]
option = l
Install |
Uninstall |
NFS Server |
NFS Client |
LPR |
LPD |
X-Server |
VT420 |
Miscellaneous
 LPD (current and previous versions only )
How to disable printing of the banner page
This option can be disabled when in the interface of the
Omni-series LPD application.
Install |
Uninstall |
NFS Server |
NFS Client |
LPR |
LPD |
X-Server |
VT420 |
Miscellaneous
 X-Server (current and previous versions only
)
How to copy and paste between xterms and windows application
- Hightlight the text to be copied in the xterm
- Point to the location where the selected text will be pasted
- To paste into a
xterm, push both right and left
mouse buttons
at the same time
- To paste into a regular editable windows application, use normal
paste function
How to get IP address if using Modem to dial out
- Dial out and connect with
PPP connection
- Use
Xopen to connect to the UNIX server
(IP address will automatically be detected by Xopen)
How to connect to UNIX Server if none of REXEC and RSH is
supported
- Initialize Omni-X
- Use
VT420 to log into your account
- At the command prompt start the x-window application
- The started application should then appear in the Omni-X
window
What else should I know
- The command path for
xterm or x-window related
application varies from
different OS. The default command path in Xopen may
not be applicable to you.
You will need to type in the right path.
- If the displayed panel is larger than default Omni-X window with
single window mode,
you can enlarge Omni-X window by changing the panning size through
Xconfig/WinMode.
Install |
Uninstall |
NFS Server |
NFS Client |
LPR |
LPD |
X-Server |
VT420 |
Miscellaneous
 VT420 (current and previous versions only)
How to change to another windows application within Windows
3.X
- Type
Ctrl-Esc to bring up the Task
Manager
- Use
Alt-Tab to select between applications
How to use keymapping tools
With VT420 you can map all your function keys to special key
strokes defined in your main server by:
- Start
VT420
- Select
Setup/Keymap in VT420 and a keyboard layout
will display for mapping
- Choose any the mappable keys then click on
Remap to
start editing
- Enter new value by either click on the keys displayed or type
from your keyboard
- Click on OK to make the new setting effective or you can save it
to a file to be loaded
Example: Click on F1 -> Remap ->
enter ABC in the text box
When you press F1 on your keyboard, it gives you
ABC on the VT420 terminal.
How to change background color
Background color can be changed by:/p>
- Select
Setup/Color Map in VT420, a color palette
will display
- To select a color for text, choose from
fore color.
- To select a color for background, choose from
back
color.
- Click on the arrow button or place a check in the box for
different setting
- When done, close the dialog and the new setting will be applied
to the display
How to exit from VT420
To avoid background process of VT420, it is advised to select
File/Exit
from the main menu to ensure complete termination of the program.
How to capture current screen into a log file
- Start VT420
- Select
File/Log and an open file dialog will pop-up
- Type in the file name to be created or to be opened
- Click on
OK. A check mark is placed beside File/Log.
- Everything typed to VT420 after the opening of the log file will
be saved.
Install |
Uninstall |
NFS Server |
NFS Client |
LPR |
LPD |
X-Server |
VT420 |
Miscellaneous
 Miscellaneous (current and previous versions only
)
How to get rid of the Evaluation Expired dialog
If you have uninstalled our software and are still getting the
Evaluation
Expired dialog, please follow the Uninstall
procedure for registry.
How to mount NFS drive automatically without starting the client
application
To automount NFS drive without starting client window, you can map
the NFS drive through
Explorer with reconnect at logon checked.
Please note that you will have to have the user login information
defined in the
Host Editor program; otherwise, you will be asked to
enter user name
and password everytime your system boots up.
Install |
Uninstall |
NFS Server |
NFS Client |
LPR |
LPD |
X-Server |
VT420 |
Miscellaneous
|